Saturday, April 30, 2016

Propane: Installing the system


Propane is commonly used to heating, cooking and heating water for our tiny homes. Many of us live in the frigid north in our tiny houses. In all areas north of approximately Dallas or Atlanta, we will need some method of heating our home. Many of us are attracted to wood heat and a wood stove. However, even with a wood stove, we need a backup heat source when we are away from our homes to keep plants, internal water tanks and other items from freezing.

Many of us also use propane for cooking and heating water. In this article, I will detail the procedures to install the propane lines. However, if you are unsure of yourself or do not have experience, please get your system tested prior to use. Trust me, a propane explosion can ruin the day of the survivors; not to mention how it can ruin the life of those that do not survive.

I chose to install my propane lines on the exterior of the house. For this application, I recommend black iron pipe. Black iron pipe will not be damaged by road debris during transport of the tiny home. Black iron pipe is available at any quality hardware or big box store. They will even cut to length and thread ends, if requested. Black iron pipe is also easy to work with; you need a pair of gloves, two pipe wrenches, 3/4" pipe and fittings, pipe dope, drill for cutting into the floor and tape measure. My entire propane system including piping, fittings, connections and the propane tank was less than $500.

I am lucky, all my appliances that use propane are on the same side of the house. I have a propane furnace, tanked water heater and a stove. If the appliances were on both sides of the home, it would be easy enough to run a line across with black iron pipe to serve both sides. My water heater and stove are relatively close, I ran one pipe up through the floor and attached a T-fitting. This allowed me to attach two separate valves, one for each appliance.

My furnace is in the living area, I ran a single line up into the living area for the furnace. This line is topped with a gas valve and then flexible gas tubing.

The rest of the pipe is installed under the trailer. I did one large run from rear to forward with two T-fittings. The T-fittings give me the option where to place my propane bottle connection. I have one T-fitting about the mid-point of my trailer so that I could put the propane bottles on the side of my home. I also have a T-fitting at the rear of my home so that I can put my bottles at the rear of my home. Planning now will give you options at a future date.

Long runs of piping are secured with plumbing strapping and also attached to a 1x6 that is secured to the bottom of the trailer.  Use sufficient strapping to keep the iron pipe secure.

Properly applying pipe dope is a bit of an art. Place the outlet of the pipe dope tube on the threads of the pipe, push out the sealant so that it completely fills the threads. You do not want any air spaces. Use your hands to push the dope into the threads then apply another coat of sealant over the threads.

Screw the fitting to the pipe and use the two pipe wrenches to tighten the fitting. Clean up excess pipe dope. It is best to not loosen the fittings once tightened. You will want them very tight so be prepared to measure and fit the pipe length during the assembly process. Once the piping is installed, wipe down with mineral spirits to remove oily residue and paint the propane iron pipe and fittings.

Choose the location of your propane tanks. I chose the rear of my home so I needed to cap the T-fitting near the midpoint of my trailer. Use a length of flexible propane hose, 20 feet in length to move the tanks away your home. Most propane company recommend that tanks are at least 20 ft from any residental structure. Attach this hose to your tanks with a propane regulator. You have the option of doing dual tanks but you will need a dual auto-changeover regulator or do this job manually.  Make sure, prior to use, that you completely pressure test your system and test for leaks using soapy solution. Prior to first use and after pressure testing, it will take time to bleed the system of air so that your propane appliances will operate. Follow all instructions with your appliances to assure all are connected correctly.

You will need some safety devices such as a carbon monoxide detector, fire extinquisher, etc. I will cover safety items in a future blog post. Go forth and enjoy your cooking, hot water and warm heat from your furnace.


Solar Power: Part 5-Generators and shore power

When I did my tiny house build, I did not have access to shore power. I guess I could have built my home with a manual hand saw but I wanted to get the job complete. I purchased a generator to power my tools and make my life a little better. When I moved into my home, it became my power source to charge my batteries till I setup my solar panels. Now, I use it to charge my batteries when there is insufficient sunshine in the winter and when I need to use my big tools.

The first step in choosing a generator is to selected generating capacity. Generating capacity is rated in watts. For example, this portable Honda generator is 2000 watts. That is sufficient for charging batteries and most power tools. Because I was building my house, I knew I wanted to plug in my table saw and my air compressor at the same time. This would exceed the capacity of a small generator. 


I was also on a very tight budget; the Honda unit is almost a grand and I wanted to spend my money on the tiny home, not the tools. The Champion 3500/4000 unit was only a bit over $300 and provided 3500 watts of power. The disadvantage of a larger generator is gas usage. My friend Ariel in Fy Nyth has a Champion 1500 generator. Her generator uses about 60% of the fuel that I use during the same time period.

I love the portability of the Honda generator. You can toss it in the truck or on  your four-wheeler-head into the bush and do work off-site. The Champion generator can be moved but it is not a fun task for a smaller person.

The next task is getting the power from the generator to the tiny house. An extension cord works best for this task. The smaller generators will just need a regular cord, such as a 12 or 14 gauge extension cord. Larger generators are able to provide higher current, you could also use a 30 amp cord set to provide greater power to your home.
After selecting your cord set, you need a way to plug the cord into your tiny home. Of course, you could just run the extension cord into the home and plug directly but I prefer to have a formal inlet. Inlets come in 15 amp, 30 amp, 50 amp, etc; match your cord set to the inlet. 
If you wire the inlet to your transfer switch (see this article), you will not need to change from the inverter to generator manually.  I also like protecting my generator from the elements. I live in an area with extreme snow so the generator box is necessary. This is the box I tossed together one afternoon.


There are many options for generators, most operate on gas but some use propane and larger ones use diesel.  The next installment of this solar power series will cover solar controllers.


Friday, April 29, 2016

Tiny House Interior Storage


Tiny houses are, uh-what is the word I am looking for-TINY. However the same storage techniques that are used in other small living spaces can be used for your tiny house. I lived aboard a cruising sailboat for 11 years; finding storage for everything aboard a boat is a common problem and these items need to be secure, out-of-the-way and convenient for use.

If you build you own tiny house, plan for storage. The wall that separates my kitchen from my bathroom is actually a storage cabinet. I have a section for liquor bottles in the top (I do not drink much but like having it available for visitors) and room for canning jars in the lower portion. 

I store all types of food items in my canning jars. Oatmeal, salt, sugar, hot chocolate, pasta, etc; this keeps food fresh and also protects it from bugs. It is also very convenient because when I am cooking, I just turn around, grab the jar, add the items to my recipe, then return the jar to the shelf. In a tiny house, we do not have large open counter spaces so the ability to return items to the shelf helps keep the counters open.

I use a variety of canning jars from the pint size for smaller items (pepper, brown sugar, salt, baking soda and powder, etc. I use the half-gallon size for oatmeal, pasta, sugar, hot chocolate, rice, and many other staples. This keeps it fresh and also protects it from bugs.

I have an Atwood tank water heater; in front of this heater is a dead space that I have also installed a cabinet for kitchen items (cooking oil, vinegar, etc) plus a draw above the heater for silverware and such.

I have my pots and pans hung under an overhead shelf. My pan lids are hung on the pans for convenience and space-saving. Plates, bowls and other items are on the shelf over the top.

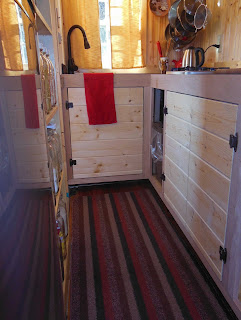
Many items you just want out-of-view. Cabinets under the kitchen counter is a perfect place for all these items. I also have my internal water tank under the kitchen counter; it is in the corner of the "L" of the cabinets. For a more complete description of my water tank see this blog post.

There are other items you use multiple times a day, such as dish soap, toothpaste and toothbrushes, cleaning pads, etc. 


I prefer my home to look tidy so I like to have a place to put everything so it is not on the counter-top. I use boxes I constructed to store these items. 


Commercial items are available for holding foil, baggies and many other items. I have my kitchen knives on a magnetic strip and my cutting board stored on the wall adjacent to my counter-top.

Another area to use is the stairs; the area under the stairs is excellent for a closet and storage cubbies. I also constructed my own light stand and store four large house batteries in this stand. Storage is also available under sofas and such. Use all your spaces for effective storage.

The sky is the limit, design away and store  your items for convenient use.

Comments and questions welcome!


Solar Power: Part 4-Transfer switches

A transfer switch is optional but a big convenience. The transfer switch automatically switches between the inverter and shore power. Shore power is any outside source of electric such as the tradional electrical grid (extension cord) or a generator.

Living off-grid, we get most of our energy from the sun but sometimes, we do not get sufficient energy from the solar panels to completely charge our batteries (such as during long winter snow storms). I use my generator as a backup to charge my batteries. Or we may want to use more current that our inverter will permit (such as a big tablesaw). On these occasions, I also use the generator.

The transfer switch has three wires. You may need to provide your own wiring for some transfer switches but the same wires will connect to your sources. One wire will plug directly into the outlet of the inverter. The other two wires connect to AC input (shore power or generator) and AC output (house electrical panel). The transfer switch automatically switches the energy to the inverter. Normally, my inverter converts my 12V battery to 120V AC power. When I use shore power, the transfer disconnects the inverter and automatically connects the shore power to provide energy to my home. There is a very short time lag for the switch over so it is best to turn off any computer and such unless they operate on an internal battery or APS battery backup.


A transfer switch is not mandatory, it is possible to do this task manually with either an electrical switch or series of electrical plugs. However, I like the lazy approach, just power up the genny and poof, I have power. My primary use of my genny is to charge my batteries or work on construction projects that require my air compressor or other tools.

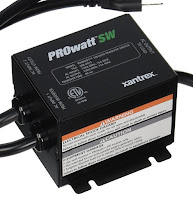
Transfer switches are rated for a maximum amperage. My needs are minimal so I have the Xantrex 15A unit but most will want a 30 amp unit or even a 60 amp unit. Transfer switches are available at electrical supply stores and amazon. I have linked the Xantrex and Go Power transfer switches at the bottom. The Xantrex is limited to 15 amps and the Go Power to 30 amp.

In part 5 I will cover connecting to shore power including generators. Thanks for being a part of this on going discussion.


Thursday, April 28, 2016

Wildlife Photography: Getting Close


Have you ever wondered how wildlife photographers get images that have the animal large in the frame? Most would say, you must have a really long lens. Well, yes I do have a 600mm and both a 1.4X and 1.7X teleconverter; but a long lens is useless over a long distance because of heat, atmospheric haze and general junk in the air.

Really, to get good images of wildlife, you must get close to the wildlife, Problem is, most wildlife do not like or trust humans. If we are clearly visible, they will usually not be so visible. 


One solution is your car; most wildlife are fairly tolerant of cars and will allow a closer approach than if a person is on foot. It is important that you do not make quick moves in the car and that you turn off the engine before taking any images (reduces vibration). 


I spent two years in Siberia. In the middle of never-never land; we do not have cars. But we still need to be hidden from the animals. One solution is to use a commercial blind or hide similar to this blind.
I have spend thousands of hours in a hunting blind waiting for the best photographs.

Another solution would be a home made blind using available materials found in nature. You can use branches for the uprights and use reeds for cover the sides; I have also used bales of hay in the past to made a blind. There is a product called a pocket blind; basically a big camo sheet you put over your head and camera-good for travel because it is small and easily transported. Many times, you can use your auto as a blind.

Sometimes, the animals will come to you. I had a big black bear come out of a tree, walk down a slope and cross the trail within two feet of me, then go back up the slope and up another tree. Six hundred plus pounds of black fur, two feet from my face, no need to check your heart rate-it is racing. Another occasion, I was hiding within some bushes by the side of a lake photographing moose. Moose have very bad eyesight but awesome hearing. So I was being very still and getting some nice images. Soon, this moose, this is her in this image, decided to come investigate what was in the bushes (me). She came within a couple inches of my face; she had not used mouthwash that day or brushed her teeth in a good while. Nevertheless, she was a good kisser :) 

 Enjoy your time in the wild but please remember, animals are wild creatures-they can be very dangerous and unpredictable.


Solar Power: Part 3-Inverter

Inverters convert your battery voltage (for example, 12 volts) to 120 volts, the typical voltage needed for appliances, computers, tools and many other household items. Lights, fans and water pumps are all available for 12 volt systems. Larger items, such as refrigerators are available as 12 volt and propane but these tend to be expensive. If you plan to be off-grid, it is best to wire the house for both 12 volt and 120 volt. The 12 volt wiring will go to a basic 12V circuit breaker panel then to the batteries. The 120 volt wiring will go to a standard household circuit breaker panel, then to the inverter and then to the batteries. It is possible to wire the circuit breaker panel so that you can use shore power (regular grid power), a generator and an inverter to power your needs. I will cover this in the next installment of this blog when I discuss transfer switches.

(image from amazon.com website)

In part one of this series, I stated that these blog articles assumed you were designing and building a basic solar power setup costing roughly $3500-5000. Therefore, I will only cover inverters for this setup. I will also assume that your battery bank is setup for 12 volt, not 24 volt or higher. Your first step in choosing an inverter is determining your needs. Inverters are rated in watts; you will need to convert all your appliances and other electrical needs into watts. Lights and other items are easy, they are rated in watts (for example, a 60 watt light bulb is 60 watts). Larger appliances might be rated in watts or amps. If amps, just convert to watts ( Amps X 12 volt = watts). Total up all your electrical needs, do not worry about amount of time used each day, just the total number of items that will run at any one time. If you do not know the energy needs or you worry that the manufacturer has been conservative in their reporting, you can determine the energy usage with a kill-a-watt meter.


Let us assume you have a refrigerator rated at 40 watts, six lights rated at 10 watts each (60 watts total), a vent fan rated at 2 amps (2 x 12 = 24 watts) and a toaster oven rated at 1200 watts. Assuming we use all these items at the same time, the total is (40+60+24+1200=1324) 1324 watts. We would need an inverter of at least 1324 watts to power our system. However, we also need a 10% margin of error (for electrical losses, voltage spikes, etc) so best to get an inverter rated at 1500 watts.

There are two basic types of inverters, modified sine-wave and pure sine-wave inverters. Without getting to technical here, know that some items will not operate or will fail if used with modified sine-wave inverters. Pure-sine waver inverters have the same waveform as traditional grid electrical current. Because the costs have fallen on pure-sine waver inverters, I see little reason to risk failure of your computer, refrigerator or other expensive items. Therefore, I recommend a pure-sine waver inverter.

There is a host of inverters sold from unknown brands to well know brands. I tend to purchase well know brands with the psychology that "you get what you pay for" (within reason). I recommend reading the reviews of others that have used the same inverter, amazon is an excellent site to read numerous reviews.

If you feel that you electrical needs will grow, I recommend purchase a larger inverter now as the cost to change will be at least double your original cost. I wish you luck and good fortune with you developing off-grid system.

This shows my inverter and my other electrical items:


Below are links to a few of the inverters I have tried and found to be quality equipment.


First Steps Toward Going Tiny


Tiny House Nation is one of the more popular programs on television. However, many of the folks that have been on this program have moved from their newly constructed tiny houses back into a conventional home. It is human nature for us to dream and fantasize of a new life divorced from financial difficulties, less clutter or other reasons to go tiny. Our mind blocks out the negatives or at least diminishes them to minor annoyances that can be overcome. I love the tiny live, the tiny house community and I am an advocate to helping others live this life.

Let us assume that you dream of owning a 20-24 ft tiny home that includes all the typical needs of a family. This includes sleeping areas, kitchen, bathroom, and living area. If you are a single person or a couple, most likely you will need one sleeping area. Larger families with children will need additional sleeping areas.
The kitchen and bathroom for a single person or a family can be the same size. The living area can also be the same size but will need more seating for larger families.
Here we are dreaming again without knowing if this life will fit our needs. I do not want to see families uproot and invested in a lifestyle that will not fit their needs and desires. So, how do we separate human desires from reality. I suggest folks simulate the tiny life in their current home. It would be difficult to exactly simulate tiny life because it is not possible to move the kitchen and bath in a conventional home without difficulty. However, you can set aside a living/sleep space in your home. Say, the master bedroom becomes your new tiny house.

Let us assume that your master bedroom is not huge, maybe 10 ft by 14 ft. For the next three months, this is your living space. Take everything out of the space that you will not move into your tiny house and store in another room in your home. Only have the items in your bedroom that you will move to the tiny house. Now, except for bathroom and kitchen duties, store and live completely in this space. You can build a platform for a bed and put a desk under to increase your living space. Other items can be constructed to maximize the usefulness of this space.

This is not as easy as it sounds. For example, when you come home from work, put your shoes and jacket in your simulated tiny house, not by the front door. Develop a new mindset, the rest of the house does not exist, it is only a passageway. Absolutely everything you need for daily living must go in your simulated tiny house (your bedroom) except bath and kitchen items.

In the kitchen, box up everything that will not move to the tiny house. The big mixer, all the extra plates and cups, extra silverware, multiple sets of pots and pans, etc. Also box up all the gadgets that you will not have space for in your tiny house. Now, each time you cook, only use the items you have not packed. If you decide you need something that is in storage, you can retrieve it but it now stays in your kitchen. It will move to the tiny house.

If you have a typical side-by-side refrigerator (approximately 20-25 cu ft), do not use a couple shelves and do not use half of the freezer. In a tiny house, the typical refrigerator is 10 cu. ft or less. Can you live with less refrigerator space? You must be very strict with yourself. If  you order a pizza and have leftovers, you can not use one of the empty shelves to store the pizza till tomorrow-that shelf will not exist in your new tiny house. Below is my 9.9 cu ft apartment refrigerator for my tiny house. It is plenty for my needs, will it be sufficient for your family?

In your bathroom, use the same techniques. Box up everything that will not go to the tiny house. All the makeup, shampoos, storage boxes, etc. Only have the items you will move to the tiny house in your bath. Also, turn off the toilet by turning the water off. Use a composting toilet, either a bucket or get a conventional commercial composting toilet (like the Nature's Head). If this experiment does not work, you can sell the composting toilet and your losses will be much less than if you have completely jumped into tiny life in a tiny home.

Try this life for at least three months. Then sit down and analyze your successes and failures. Were you honestly able to live in the space you set aside or were you expanding into the other spaces of the house. Big question: did you thrive with this new paradigm. Three months is long enough so that it does not feel like camping. If you enjoyed living in this tiny space, you were honestly able to live in this space and you still want to live this way, then it is truly time to move forward to the tiny life.

If not, this is not a failure; maybe you learned that you can downsize from your 2500 sq. ft home to 1000 sq ft. Maybe you learned that this is not the life for you and your family. Or just maybe, you have found the lifestyle that truly fits you needs, the tiny life. If so, them most of your downsizing is finished. All the items stored (except the items in the bedroom, kitchen and bath) will need to be discarded, sold, re-purposed, given away or put into storage. I wish you success in your trial.


During my transition, I found this book very useful. 

Wednesday, April 27, 2016

Solar Power: Part 2-Batteries

Without batteries, you will only be able to use solar power when the sun is shining. Honestly that is not so convenient so I would say batteries are a necessity with a solar panel system. Of all the battery choices (wet cell, maintenance free, lithium, Tesla, salt water, etc), I only have experience with wet cell and maintenance free batteries. Therefore, I will limit my discussion to these two types of batteries. These are also the most common types used for solar power.

Most of us own or have owned a car; a battery is used to start the car and power parts of the car during use. Typically this is a wet cell or maintenance free battery. These batteries work great because they are given a continuous charge during use. However, once you turn off the engine, it does not take long for these batteries to drain. Another type of battery, common in golf carts, sailboats and electric wheel chairs is deep cycle batteries. These batteries are designed to be charged and discharged repeatedly; however they are not designed to be discharged completely. It is best if deep cycle batteries are not discharged below 40-50%. Typical life of a car battery is 3-4 years. Typical life of a well cared for deep cycle battery is 7-10 years. Typical life for a poorly cared for deep cycle battery is 1-3 years; they are much to expensive not to care for properly. Batteries will be about 1/3 (or greater) of your solar budget.

When I lived aboard a sailboat, I had wet cell golf cart batteries. I used two 6 volt Trogan T105 wired together in series to make a 12V battery bank. These were strong reliable batteries but it was a pain because wet cell batteries give off small amounts of hydrogen gas in addition to the possibility of sulfuric acid spills. Wet cell batteries need to be vented and also maintained (water added). I prefer to have my batteries inside my home and I did not want to vent them to the outside as that opened up another hole in my structure. Maintenance free, for me, are a better choice.
 (Image from amazon.com)
Maintenance free batteries are available as automotive, deep cycle gel cells and deep cycle AGM (absorbed glass mat). Automotive batteries are a no-go for the reasons previously stated; gel cells (in my opinion) are temperamental but I like the AGM batteries. This is a sealed maintenance free battery, it can be mounted normally, sideways or even upside down. AGM were designed to use in military jets.

Deep cycle batteries are rated in amp hours; this is like the storage capacity of a water tank. Amp hours is the amount of energy the battery will store if fully-charged. For example, my AGM batteries are 125 amp hours each. As previously stated, you should only discharge a deep cycle battery approximately 50%; therefore an 125 amp hour battery is only really providing 62.5 amp hours of energy for use before needing to be completely recharged.

In part one of this series on solar power, I mentioned this series of blog articles would be for a basic solar setup costing in the neighborhood of $3500-5000. This size setup can easily accommodate 4-6 AGM batteries. I have experience with both the Vmax 125 amp hr and the 155 amp hr batteries. Both are excellent. When combined (wired in parallel so it remains 12V but the amp hours are additive) into a system, four 125 amp hr batteries will provide 500 amp hr (125 x 4 = 500) of storage or 250 amp hr (50% of 500) of usage before recharging.

Shown below is my battery storage, two batteries on each shelf and enclosed in a cabinet that becomes a lamp stand next to my chair. This is the advantage of AGM batteries, they do not need maintenance so can be stacked.

 I have room under the sofa for further battery storage if I decide to expand my system at a later date. This is important, always plan for expansion of your system so you are not locked into a set system.

In the next installment of this series on solar power, I will discuss the inverter. The inverter converts the battery power to AC electrical current for use in typical appliances and other needs in your home.

Below are affiliate links for the batteries discussed in this article. As always, questions are welcome.


Wildlife Photographgy: Making money with stock

         (all images copyright of Moose Henderson)


Wildlife photography is an exciting occupation but frequently not lucrative. Except for a few, most full-time wildlife photographers supplement their income with workshops and such.

Some sell their wares at art shows or also branch out into consumer photography, such as weddings, portraits or even pet photography.

This blog post will cover the basics of stock photography. Stock agencies host and market your images and take a large percentage of the sales income. There are two main types of stock agencies, tradition and micro stock. The traditional agencies require a contract and monthly or quarterly uploads of fresh stock. Typically traditional agencies sell images at a higher cost and return a higher investment. Micro stock agencies sell images for much less but you make money by the volume of images sold. Micro agencies also do not have set submission requirements for uploads. They will accept one image or thousands.

The images that sell best via stock is concept images; images the illustrate a concept or idea that goes with an article or publication. I won the grand prize at a major contest with the Jumping Arctic Fox image at the top of this post but it has never sold as stock. However, I have sold hundreds of the following bald eagle and mountain lion image. These illustrate the concepts of strength, freedom, majesty, etc. so they fit a wide variety of uses.

Other images, like this bird seed, may only sell once in a blue moon. However, if you sell 1000 different "single sale" images per year, you are making a bit more money than if you sold none.

So, let us look at some actual numbers. I have a bit over 1000 images on 26 different stock agencies. Each agency does their own marketing and some do not do well; other do quite well. Of the 26 agencies, only a hand-full provide an income on a regular basis. See, the stock agencies will not pay you for your images until you reach a threshold of money; some are $50, others $100. Therefore, even if an agency sells your best image, you will not get the money till you achieve this threshold. Typical sale price ranges from 0.33 cents to $20 plus dollars. So, if a stock agency is a slow seller, you may never get your money as you will never reach the threshold.

However, this blog is not about "doom and gloom"; it is about making passive income via wildlife stock. As I said, I have roughly 1000 images (the same 1000 images) on multiple sites. On average, I make approximately $150-300/month from my images. Typically that number represents approx. 250 images sold per month. Remember, this is micro stock, they are selling volume, not high prices. It is also passive income. I put all my images in the agencies in 2007. I have not added a single image or done anything other than retrieve my money for the past seven years. I do plan to add more images but I have been working toward my PhD in moose ecology so photography was moved to the back burner.

My top two stock agencies (I make 85% of my monthly income from these two) are Shutterstock and Dreamstime. Here are links for these agencies (my company name for my wildlife photography is Visceral Image):

http://www.shutterstock.com/

http://www.dreamstime.com/visceralimage_info

The next 10% of my income comes from the following agencies:

http://depositphotos.com/home.html
https://us.fotolia.com/
http://www.istockphoto.com/
http://www.bigstockphoto.com/

The last 5% comes from the balance of my stock agencies which include Veer, 123 Royalty Free, isignstock, Graphic Leftovers and many more. Thanks for being a part of my blog and I wish you the best of luck in your photography adventures. Questions welcome; trust me, you are not boring me!


Tuesday, April 26, 2016

Wildlife Photography: Planning Your Strategy

                           (note: all images copyright of Moose Henderson)
 
As a wildlife photographer, we typically take pictures of the same animals everyday. It is important to have a plan or strategy for your photographic outings. Let’s assume you have a cooperative bird or animal that you can spend a fair amount of time taking images. Let’s say you are spending a week at a nature park like Yellowstone National Park where the animals are plentiful. You certainly do not want a weeks worth of the same images of the same animal. You want a variety to meet multiple needs of the future buyers of your images. Editors of magazines are famous for requesting a variety of images. Guess what, Dreamstime also want variety; submit 40 images of the left side of a squirrel and count on one or two being accepted. The following is my approach when I have a cooperative animal.

Classic ID Picture: One of the easiest images to obtain is the classic guidebook or identification book image; usually a profile or three-quarter view of the entire animal. I always try to get both a horizontal and vertical classic ID image. Here are a couple examples; a Cottontail Rabbit and a Bald Eagle. Because the cottontail rabbit is named for its classic white rump, it is important to show this area in your identification image.


Portrait Image: Getting the portrait image is a bit more of a challenge because it requires you to be close and intimate with the animal. Most times a portrait is vertical orientation but I try to get both. I like my portraits to have nice soft lighting without harsh shadows. I like this coyote image, moose and female mountain goat image because they show the character of the animals.


 Cover Shot: I try to get a classic cover shot which is a vertical orientation photograph with room on the top for a banner and some room on the sides for print. A cover shot is usually pretty dynamic, colorful and eye-catching. This Great Blue Heron at the Venice Rookery has excellent lighting and is a classic cover shot.
Action Image: If you are photographing birds, action could be flight images or feeding images; even something so simple as a bird stretching or opening their beaks provides a good action shot; remember to do both vertical and horizontal. If you are photographing animals, an action shot could be animals catching food or other activities.

 So, when you are out photographing, don’t just accept what enters your viewfinder. Plan your strategy so that you look for the interesting shots and you are prepared for them when they happen.