Showing posts with label off-grid. Show all posts

Wednesday, May 4, 2016

Friends that share my direction

 One of my closest Tiny House friends is Ariel of Fy Nyth. She and her tiny house are in the mountains of NW Wyoming; a place I think of as paradise. This is an area with abundant animals, not so many people, lots of outdoor activities and beautiful mountains. A couple years ago, Ariel purchased a new Tumbleweed Tiny House, 24 ft in length and lives alone except for a few outdoor cats and friends that come to visit.

There is seldom a day that we do not exchange messages. However, we have never met (as of early May 2016). We do plan to meet soon and we will be presenting a joint presentation at the 2016 Tiny House Jamboree on Off-grid Living and Homesteading.  The following picture is from her blog with tons of informative posts, many pictures of animals and also interesting info on her life. Ariel is like a daughter to me, she is such a sweetheart. Her blog is located at this link: Fy Nyth
Fy Nyth in the mountains of northwest Wyoming.
 In addition to being located in paradise, Ariel also has a large garden. She grows much of her own food and cans it in her tiny house. She also does laundry at her tiny house and she is an avid photographer. In her area, they get approximately 400 inches of snow annually (honestly, that is not a misprint, 400 inches). She has both a propane furnace and a new Grey Stove (wood stove). I am proud to call her my friend. I encourage you to visit her site and learn from her extensive experience.


Next, is Nick and Ester Emery of Fouch-o-matic off-grid. Their site is named after Nick's ability to make a functioning item from spare parts. They do not live in a tiny house; well actually they do. They are living in a yurt on their property during the construction of their "post and beam" house. Ester is the daughter of Carla Emery who wrote the classic self-sufficiency book "The Encyclopedia of Country Living". Nick and Ester have three children; one boy and two girls. We have never met, in fact, we have never exchanged letters, messages or any other form of communication. Nevertheless, I am a big fan of their youtube videos about off-grid living and homesteading. I hope you will give their site a look and I hope you enjoy it as much as I. The link to their youtube videos is: Fouch-o-matic

I have the aforementioned encyclopedia of country living and it is essential to homesteading living. I purchased the kindle edition as I do not have room on my bookshelf for a book of 900 plus pages. Below is an affiliate link to the book.

Kindle Edition

Print Edition


Monday, May 2, 2016

TV, movies and free shipping


We all need a bit of rest from the pressures of everyday life. TV and movies provide entertainment and relief. Many of us that live off-grid also live away from intown conveniences; such as big box hardware stores, specialty stores such as cooking supplies, or even common stores. Most of us are close enough to civilization to have internet (DSL, cable or satellite) and package delivery.

For the past seven years, I have not had cable television and have not been a subscriber of any of the paid services, such as Hulu, Netflix, etc. However, I have been an Amazon Prime member. This membership provides me free "two-day" shipping on all items directly sold by Amazon. This is an large savings because of the volume of packages I order each year.

Try Amazon Prime 30-Day Free Trial

Amazon Prime membership also provides all my TV and movie entertainment. Granted, new releases or current shows are not part of the membership package but many of the shows I love are part of this membership. 

They also have a discounted membership for students. As a graduate student, I have qualified for this discount; they have put no restrictions on my account because of this discount. If you have not given Amazon Prime a try, it might be worth the effort to do a free trial membership.

Order a couple items during the trial to see how you like getting free two-day shipping; watch a few movies and maybe a couple TV shows. I am a fan of the TV series Justified, NYPD Blue and Sopranos; all are available for my enjoyment with no additional fees.  I believe they also have a music service but I have not tried it. 

Some shows are only available on a pay-per-watch basis. I have never watched any of these shows. Living on a tight budget, I enjoy my Prime membership but do not take part in the other non-prime aspects. All are welcome to ask questions about my experiences. Thanks, I hope this has been helpful for those that wish to give Amazon Prime a try.


Sunday, May 1, 2016

Solar Power: Part 6-Solar charge controller


The purpose of a solar charge controller is to regulate the current from the solar panels so that you do not damage the batteries. There are many descriptions of charge controller types and their function; I will not attempt to describe them in this article but I will refer you to this article. Why reinvent the wheel when it has been done well by others with greater knowledge.

However, what is not covered well in most other articles is how to choose the proper size charge controller. It is important to match the controller to the output of your solar panels. Getting a charge controller larger than your needs will not cause any damage but choosing a charge controller of insufficient capacity could cause a fire by overheating the controller.

Of the two basic types of charge controllers (PWT and MPPT), I much prefer the MPPT because of better charge regulation and because more of the solar panel output is directed to the batteries. Reading the above referenced article will help decipher a bit of the fog about charge controller types. I also recommend the Solar Electric Handbook (see link at bottom).

Solar controllers have a rated amperage. For example, my Renogy MPPT solar controller is rated at 40 amps. This is the maximum input amperage. Solar panels are rated in watts. We are back in the United Nations where everyone is speaking a different language (amps, watts, volts, etc). However, we can convert watts to amps with the following formula: Amps = Watts/Voltage.

In part one of this series, I stated that we are designing a basic 12V solar charge system costing $3500-5000. You can build a larger or smaller system, this just gives us a starting point so I can restrict my discussion to components that fit this system.

So, how many solar panels can I add to my solar charge system if I have a 40 amp charge controller. Forty amps is 480 watts for a 12 volt system. However, you do not want to exceed the capacity of the charge controller, when the sun is high in the sky with clear blue skies,  your panels will frequently exceed their rated capacity. So, let's leave a 10% margin of error (480 watts - 10% = 432 watts). Therefore, we can safely add 432 watts of solar panels to our system.

Solar panels are cheaper per watt the larger the panel you purchase. Typically, one 200 watt panel will be cheaper than two 100 watt panels. You will also save on mounting hardware, wires, and such by purchasing higher capacity panels. Panels also come in various sizes and it is important to match the panel size to your available space. This image shows the various components of my solar charge system (except batteries and solar panels); it is important to place the charge controller in an area that will get some circulation, charge controllers have cooling fins and need air circulation.


I will cover solar panels in Part 7 of this series. For my system, I choose four 100 watt panels because this fit the space I had available for my unit and this did not exceed the capacity of my charge controller. At a future date, I will install a second charge controller and four additional 100 watt panels.

There are many choices for charge controllers and books, these are the ones I have purchased and had good luck using. I wish you all well.


Saturday, April 30, 2016

Propane: Installing the system


Propane is commonly used to heating, cooking and heating water for our tiny homes. Many of us live in the frigid north in our tiny houses. In all areas north of approximately Dallas or Atlanta, we will need some method of heating our home. Many of us are attracted to wood heat and a wood stove. However, even with a wood stove, we need a backup heat source when we are away from our homes to keep plants, internal water tanks and other items from freezing.

Many of us also use propane for cooking and heating water. In this article, I will detail the procedures to install the propane lines. However, if you are unsure of yourself or do not have experience, please get your system tested prior to use. Trust me, a propane explosion can ruin the day of the survivors; not to mention how it can ruin the life of those that do not survive.

I chose to install my propane lines on the exterior of the house. For this application, I recommend black iron pipe. Black iron pipe will not be damaged by road debris during transport of the tiny home. Black iron pipe is available at any quality hardware or big box store. They will even cut to length and thread ends, if requested. Black iron pipe is also easy to work with; you need a pair of gloves, two pipe wrenches, 3/4" pipe and fittings, pipe dope, drill for cutting into the floor and tape measure. My entire propane system including piping, fittings, connections and the propane tank was less than $500.

I am lucky, all my appliances that use propane are on the same side of the house. I have a propane furnace, tanked water heater and a stove. If the appliances were on both sides of the home, it would be easy enough to run a line across with black iron pipe to serve both sides. My water heater and stove are relatively close, I ran one pipe up through the floor and attached a T-fitting. This allowed me to attach two separate valves, one for each appliance.

My furnace is in the living area, I ran a single line up into the living area for the furnace. This line is topped with a gas valve and then flexible gas tubing.

The rest of the pipe is installed under the trailer. I did one large run from rear to forward with two T-fittings. The T-fittings give me the option where to place my propane bottle connection. I have one T-fitting about the mid-point of my trailer so that I could put the propane bottles on the side of my home. I also have a T-fitting at the rear of my home so that I can put my bottles at the rear of my home. Planning now will give you options at a future date.

Long runs of piping are secured with plumbing strapping and also attached to a 1x6 that is secured to the bottom of the trailer.  Use sufficient strapping to keep the iron pipe secure.

Properly applying pipe dope is a bit of an art. Place the outlet of the pipe dope tube on the threads of the pipe, push out the sealant so that it completely fills the threads. You do not want any air spaces. Use your hands to push the dope into the threads then apply another coat of sealant over the threads.

Screw the fitting to the pipe and use the two pipe wrenches to tighten the fitting. Clean up excess pipe dope. It is best to not loosen the fittings once tightened. You will want them very tight so be prepared to measure and fit the pipe length during the assembly process. Once the piping is installed, wipe down with mineral spirits to remove oily residue and paint the propane iron pipe and fittings.

Choose the location of your propane tanks. I chose the rear of my home so I needed to cap the T-fitting near the midpoint of my trailer. Use a length of flexible propane hose, 20 feet in length to move the tanks away your home. Most propane company recommend that tanks are at least 20 ft from any residental structure. Attach this hose to your tanks with a propane regulator. You have the option of doing dual tanks but you will need a dual auto-changeover regulator or do this job manually.  Make sure, prior to use, that you completely pressure test your system and test for leaks using soapy solution. Prior to first use and after pressure testing, it will take time to bleed the system of air so that your propane appliances will operate. Follow all instructions with your appliances to assure all are connected correctly.

You will need some safety devices such as a carbon monoxide detector, fire extinquisher, etc. I will cover safety items in a future blog post. Go forth and enjoy your cooking, hot water and warm heat from your furnace.


Solar Power: Part 5-Generators and shore power

When I did my tiny house build, I did not have access to shore power. I guess I could have built my home with a manual hand saw but I wanted to get the job complete. I purchased a generator to power my tools and make my life a little better. When I moved into my home, it became my power source to charge my batteries till I setup my solar panels. Now, I use it to charge my batteries when there is insufficient sunshine in the winter and when I need to use my big tools.

The first step in choosing a generator is to selected generating capacity. Generating capacity is rated in watts. For example, this portable Honda generator is 2000 watts. That is sufficient for charging batteries and most power tools. Because I was building my house, I knew I wanted to plug in my table saw and my air compressor at the same time. This would exceed the capacity of a small generator. 


I was also on a very tight budget; the Honda unit is almost a grand and I wanted to spend my money on the tiny home, not the tools. The Champion 3500/4000 unit was only a bit over $300 and provided 3500 watts of power. The disadvantage of a larger generator is gas usage. My friend Ariel in Fy Nyth has a Champion 1500 generator. Her generator uses about 60% of the fuel that I use during the same time period.

I love the portability of the Honda generator. You can toss it in the truck or on  your four-wheeler-head into the bush and do work off-site. The Champion generator can be moved but it is not a fun task for a smaller person.

The next task is getting the power from the generator to the tiny house. An extension cord works best for this task. The smaller generators will just need a regular cord, such as a 12 or 14 gauge extension cord. Larger generators are able to provide higher current, you could also use a 30 amp cord set to provide greater power to your home.
After selecting your cord set, you need a way to plug the cord into your tiny home. Of course, you could just run the extension cord into the home and plug directly but I prefer to have a formal inlet. Inlets come in 15 amp, 30 amp, 50 amp, etc; match your cord set to the inlet. 
If you wire the inlet to your transfer switch (see this article), you will not need to change from the inverter to generator manually.  I also like protecting my generator from the elements. I live in an area with extreme snow so the generator box is necessary. This is the box I tossed together one afternoon.


There are many options for generators, most operate on gas but some use propane and larger ones use diesel.  The next installment of this solar power series will cover solar controllers.


Friday, April 29, 2016

Solar Power: Part 4-Transfer switches

A transfer switch is optional but a big convenience. The transfer switch automatically switches between the inverter and shore power. Shore power is any outside source of electric such as the tradional electrical grid (extension cord) or a generator.

Living off-grid, we get most of our energy from the sun but sometimes, we do not get sufficient energy from the solar panels to completely charge our batteries (such as during long winter snow storms). I use my generator as a backup to charge my batteries. Or we may want to use more current that our inverter will permit (such as a big tablesaw). On these occasions, I also use the generator.

The transfer switch has three wires. You may need to provide your own wiring for some transfer switches but the same wires will connect to your sources. One wire will plug directly into the outlet of the inverter. The other two wires connect to AC input (shore power or generator) and AC output (house electrical panel). The transfer switch automatically switches the energy to the inverter. Normally, my inverter converts my 12V battery to 120V AC power. When I use shore power, the transfer disconnects the inverter and automatically connects the shore power to provide energy to my home. There is a very short time lag for the switch over so it is best to turn off any computer and such unless they operate on an internal battery or APS battery backup.


A transfer switch is not mandatory, it is possible to do this task manually with either an electrical switch or series of electrical plugs. However, I like the lazy approach, just power up the genny and poof, I have power. My primary use of my genny is to charge my batteries or work on construction projects that require my air compressor or other tools.

Transfer switches are rated for a maximum amperage. My needs are minimal so I have the Xantrex 15A unit but most will want a 30 amp unit or even a 60 amp unit. Transfer switches are available at electrical supply stores and amazon. I have linked the Xantrex and Go Power transfer switches at the bottom. The Xantrex is limited to 15 amps and the Go Power to 30 amp.

In part 5 I will cover connecting to shore power including generators. Thanks for being a part of this on going discussion.


Thursday, April 28, 2016

Solar Power: Part 3-Inverter

Inverters convert your battery voltage (for example, 12 volts) to 120 volts, the typical voltage needed for appliances, computers, tools and many other household items. Lights, fans and water pumps are all available for 12 volt systems. Larger items, such as refrigerators are available as 12 volt and propane but these tend to be expensive. If you plan to be off-grid, it is best to wire the house for both 12 volt and 120 volt. The 12 volt wiring will go to a basic 12V circuit breaker panel then to the batteries. The 120 volt wiring will go to a standard household circuit breaker panel, then to the inverter and then to the batteries. It is possible to wire the circuit breaker panel so that you can use shore power (regular grid power), a generator and an inverter to power your needs. I will cover this in the next installment of this blog when I discuss transfer switches.

(image from amazon.com website)

In part one of this series, I stated that these blog articles assumed you were designing and building a basic solar power setup costing roughly $3500-5000. Therefore, I will only cover inverters for this setup. I will also assume that your battery bank is setup for 12 volt, not 24 volt or higher. Your first step in choosing an inverter is determining your needs. Inverters are rated in watts; you will need to convert all your appliances and other electrical needs into watts. Lights and other items are easy, they are rated in watts (for example, a 60 watt light bulb is 60 watts). Larger appliances might be rated in watts or amps. If amps, just convert to watts ( Amps X 12 volt = watts). Total up all your electrical needs, do not worry about amount of time used each day, just the total number of items that will run at any one time. If you do not know the energy needs or you worry that the manufacturer has been conservative in their reporting, you can determine the energy usage with a kill-a-watt meter.


Let us assume you have a refrigerator rated at 40 watts, six lights rated at 10 watts each (60 watts total), a vent fan rated at 2 amps (2 x 12 = 24 watts) and a toaster oven rated at 1200 watts. Assuming we use all these items at the same time, the total is (40+60+24+1200=1324) 1324 watts. We would need an inverter of at least 1324 watts to power our system. However, we also need a 10% margin of error (for electrical losses, voltage spikes, etc) so best to get an inverter rated at 1500 watts.

There are two basic types of inverters, modified sine-wave and pure sine-wave inverters. Without getting to technical here, know that some items will not operate or will fail if used with modified sine-wave inverters. Pure-sine waver inverters have the same waveform as traditional grid electrical current. Because the costs have fallen on pure-sine waver inverters, I see little reason to risk failure of your computer, refrigerator or other expensive items. Therefore, I recommend a pure-sine waver inverter.

There is a host of inverters sold from unknown brands to well know brands. I tend to purchase well know brands with the psychology that "you get what you pay for" (within reason). I recommend reading the reviews of others that have used the same inverter, amazon is an excellent site to read numerous reviews.

If you feel that you electrical needs will grow, I recommend purchase a larger inverter now as the cost to change will be at least double your original cost. I wish you luck and good fortune with you developing off-grid system.

This shows my inverter and my other electrical items:


Below are links to a few of the inverters I have tried and found to be quality equipment.


Tuesday, April 26, 2016

Solar Power: Part 1-Introduction


Entire books are written the subject of solar setups so I will try to digest it down to the basics.  The book I would recommend for learning about setting up a solar power system is the Solar Electric Handbook. (Purchase of any of these items through our links will give us a few pennies to cover internet costs and allow us to continue providing additional content, thank you).

 Designing a solar power system can be fraught with tension and stress. There are so many terms and it seems each device uses a different nomenclature. There are watts, amps, amp hours, volts, etc. It is enough to make you think you are at the United Nations and no one has a translator.

In a series of post, I will show you how I designed my solar power system and I will detail the reasons for each item I selected. I am assuming you want a basic system that cost $5,000 or less and will provide for basic needs such as a refrigerator, LED lights, tv, fans, laptop and mobile phone charger, and other basic needs. Appliances requiring high electrical needs (heaters, large air conditioners, clothes dryers, etc) can be operated with solar but require a larger system and most likely you will need a qualified professional for the install. What I will detail is a basic system I use in my tiny house.

Let us first list the required components: solar panels, solar controller, inverter, batteries, fuses, maybe a battery charger, transfer switch and monitors, and wires to connect all together. I installed the solar controller, inverter, transfer switch and my main electrical panel in a box on the tongue of my tiny house trailer. These items are outside my home but protected from the elements. The attached photograph shows the basic components. I will detail my reasons for each item in a series of blog posts but many other items work just as well if not better.

Batteries can not be stored outside in my region because they will loose amperage in cold weather. I have four deep cycle AGM batteries installed into a cabinet that is also my lamp stand adjacent to my chair.

Your first duty is to determine: Can you afford to go solar. If all you need is one or two LED lights and charging your mobile phone, you can setup a system for $100 or so. However, operating a tiny house with more comfortable needs will cost a bit more and will depend on your needs. A basic system will cost approximately $3-4,000 dollars (assuming new components). I define a basic system as one that can power an apartment size refrigerator, tv and dvd player, laptop computer, LED lights, fans, and other basic needs.  Therefore, moving forward, we are designing a basic system as I defined above.

Wow, $4,000 dollars, that is a bit steep for a basic system-some will say. However, the cost to get electrical service in the bonnies can top well over $30,000 or more. Solar is also an investment, being off-grid frees you from the invoices of the power grid. If you are a prepper, solar will be the only power available when the grid is shutdown by unrest or other problems.

Most books and professionals will tell you first need to add up all your electrical needs to design your system. I prefer to work backwards designing my system (figure out the system I could afford and then see what it would power) because I am on a limited income. I have no choice but to do solar because the electrical grid is not available to me.

So, this is how I started. I planned for a $3500 system with all new quality components. This would be able to generate 400 watts of power from four 100 watts solar panels. This is where it get confusing; it is not complicated but can be tedious because not all items speak the same language. Your friend is the following formulas:

Watts = Amps X Voltage
or the same formula rewritten as

Amps=Watts/Voltage

I may have lost a few of you, not to worry, this will not be a math class. I will give you instructions to figure your needs. Let us assume you live up north where there is less sunshine in the winter. If you live in Texas, Florida or other areas with abundant sunshine, you will have much more power available 12 months of the year. Living up north, we get about 7 hours of usable sunshine per day in the winter (assuming blue skies or light overcast).  Remember that figure from above, 400 watts from the solar panels. Take the hours of usable sunshine per day (7) and multiply it by the 400 watts to give you the total energy generated per day in the winter from your solar panels; in this example that is 2800 watts. You will get some loss of power because of resistance of the wires and such so let us assume you are getting 2500 watts of power added to your batteries each day. Of course, in the summer you will have more sunshine but you need to design you system for the times of the year with limited sunshine. Unless you have a summer cabin that is not used in winter or some other twist; I am assuming you are designing this system for year around use.

WooHoo, now we are making progress. But wait, batteries are measured in amps or amp hours.  No worries, just convert it. 2500 watts on a 12V system is 208 amps (2500 watts/12 volts = 208 amps). So, on this one day of sunshine you have added 208 amps to your batteries (assuming the batteries needed to be charged). Wait, you can not use all that energy because your batteries should not be discharged below 50% (assuming you have lead acid batteries, not salt water batteries). Therefore, divide the 208 amps by half to get roughly 104 amps for your daily use.

Ooops, here we are again at the United Nations; most electrical items are not rated in amps, many are rated in watts. For example, a 60 watt bulb or a 37 watt refrigerator. No worries, just convert it again: 104 amps X 12 volts = 1248 watts. You have 1248 watts available for your 24 hour day; the next day more energy will be generated. Some days, you might have excess and other day, you might draw more than what is generated from the batteries.

In the next blog post in this series, I will explain batteries and how to calculate your needs for battery storage and use.


Off-grid-Water for your home


Dealing with water needs can be a challenging part of being off-grid. If you have access to a well and a hose, it will be relatively simple to connect your home to pressure water. However, many of us will not have access to pressure water and will need an internal or external tank for water storage and some type of pump to deliver the water to faucets and other outlets. I am among the camp that has an internal water tank.
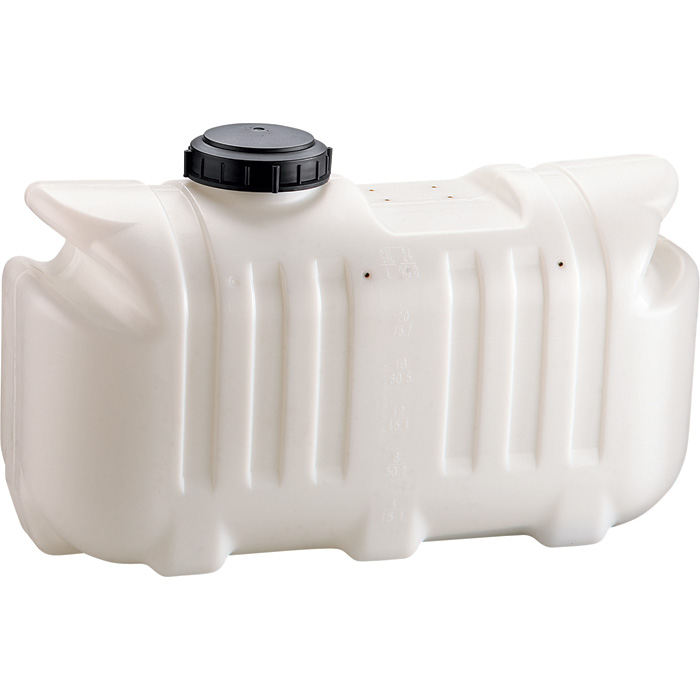
When I was building my home, I planned for my water tank under the kitchen counter in the corner of the "L". This is a space that is frequently difficult to access so why not put something in that space that does not need frequent access. One of the cheapest and strongest tanks I could find was a basic "spot sprayer" designed for garden use; mine is 26 gallons and approx. $60 with postage (from Northern Tool).
This tank has a mounting pad on top for a 12V pump. However it does not have an inlet for the pump siphon-a drill will open a hole and a piece of PVC (about 1/2" diameter) will work for the siphon. Make sure to vacuum out any drill debris before use as it will clog the pump. I purchased the flojet 2.9 gpm 50 psi water pump from amazon and mounted it atop my tank.
The left side of the pump with the inline filter goes to my PVC siphon tube in the tank and the right side goes to my plumbing lines. 

Below are a couple images showing the installation. The large diameter plastic hose is my water fill that hooks up to my exterior water fill panel.


The left hole is for filling the tank and the right side is for hooking up pressure water. The small round screen between the two fills is for venting the tank.

I have three plastic jugs, about 7 gallons each, that I use to bring water to my home. These are a bit to heavy to hold up while the water drains into the fill so I setup a 120V water pump outside my house to draw from the totes and pump into the tank. Because I live in a cold environment, I disconnect both hoses from the pump so no water is retained in the pump-freezing would destroy the pump and lead to a bad day.
My water tank services my kitchen sink, my bathroom sink and my shower. This is a labeled drawing of the rats nest of pipes that feed the various faucets.


Let me know any questions and I will try to help with better information. (Purchase of any of these items through our links will give us a few pennies to cover internet costs and allow us to continue providing additional content, thank you).