Showing posts with label energy. Show all posts

Thursday, May 5, 2016

Solar Power: Part 7-Panels

Image from amazon.com website

Solar panels make up the backbone of the solar charging system; they provide the energy that is delivered through the solar controller into the batteries. Solar technology is changing quickly. At the current time, there are three types of solar panels that fit the basic system ($3500-5000) we discussed in the first article of this series. The three types are monocrystalline, polycrystalline, and thin-film. Each as advantages and disadvantages.

Monocrystalline panels are made from crystals of silicon and have a characteristic uniform color. The individual cells are not square because of the growth form of the crystals; the cutting process of the crystal produces angled or rounded edges. Because the silicon is grown as a crystal, the efficiency is higher; however so is the cost. They are also the most space efficient and have the longest life. Monocystalline panels suffer more when partially shaded. However, new technology has partially solved this problem with the addition of diodes that allow the un-shaded portion of the panel to continue to produce energy.

Image from amazon.com website
Monocrystalline panels will be more expensive than polycrystalline. Polycrystalline panels have uneven coloring and square cells because of the manufacturing process which consist of poured silicon, not crystals. They will be less expensive than the monocrystalline panels but also slightly less efficient. Because of this loss in efficient, polycrystalline panels of similar wattage will be larger than monocrystalline panels. Polycrystalline also have slightly lower heat tolerance but this is typically not a problem for most tiny home homeowners. If mounted on a black roof, the panels would suffer because of the increased heat.

Image from amazon.com
The third type is thin-film panels. These are the flexible panels. The manufacturing process consist of depositing multiple thin layers of photovoltaic material. There are multiple types of photovoltaic material but I will not detail these types. The reader is encouraged to research the different types if they desire this detailed knowledge. The primary advantage of thin-film panels is flexibility. If you have a bus tiny house and you want to contour the panels to the bus roof, thin-film would fit this application. However, thin-film have the lowest efficiency of the three types; panels of similar wattage to mono or polycrystalline will be larger. However, they are cheaper to manufacture and many times cheaper to purchase. They are also less sensitive to shading than mono or polycrystalline panels.

Solar panels are rated in watts. Panels with higher wattage will be larger. When choosing the panels, it is important to choose panels that will fit the space available. If you will be mounting the panels on an independent frame, then size will be less of an issue. Typically, higher wattage panels have a lower cost per watt than lower wattage panels.

Multiple panels can be combined in series to increase the wattage. For example, four 12V-100 watt panels combined in series will provide 400 watts of power at 12V. Remember to not exceed the capacity of your solar controller. A set of panels of 400 watts is feeding at least 33 amps of energy to the controller when in full sun (400 watts/12V=33.33 amps). However, panels will typically generate greater than their stamped efficiency in full sun so it is important to not overpower your controller. Controllers were discussed in part 6 of this series. A 40 amp controller will accept 40 amps (480 watts at 12V); 40 amps of solar panels could generate much more than 40 amps on a bright sunshiny day. This is the reason I am only using four 100 watt panels rated at 33.33 amps.

The next installment of this series will cover wiring. Wiring connects the batteries together; connects the inverter to the batteries, connects the panels to the solar controller and connects the solar controller to the batteries.

Saturday, April 30, 2016

Solar Power: Part 5-Generators and shore power

When I did my tiny house build, I did not have access to shore power. I guess I could have built my home with a manual hand saw but I wanted to get the job complete. I purchased a generator to power my tools and make my life a little better. When I moved into my home, it became my power source to charge my batteries till I setup my solar panels. Now, I use it to charge my batteries when there is insufficient sunshine in the winter and when I need to use my big tools.

The first step in choosing a generator is to selected generating capacity. Generating capacity is rated in watts. For example, this portable Honda generator is 2000 watts. That is sufficient for charging batteries and most power tools. Because I was building my house, I knew I wanted to plug in my table saw and my air compressor at the same time. This would exceed the capacity of a small generator. 


I was also on a very tight budget; the Honda unit is almost a grand and I wanted to spend my money on the tiny home, not the tools. The Champion 3500/4000 unit was only a bit over $300 and provided 3500 watts of power. The disadvantage of a larger generator is gas usage. My friend Ariel in Fy Nyth has a Champion 1500 generator. Her generator uses about 60% of the fuel that I use during the same time period.

I love the portability of the Honda generator. You can toss it in the truck or on  your four-wheeler-head into the bush and do work off-site. The Champion generator can be moved but it is not a fun task for a smaller person.

The next task is getting the power from the generator to the tiny house. An extension cord works best for this task. The smaller generators will just need a regular cord, such as a 12 or 14 gauge extension cord. Larger generators are able to provide higher current, you could also use a 30 amp cord set to provide greater power to your home.
After selecting your cord set, you need a way to plug the cord into your tiny home. Of course, you could just run the extension cord into the home and plug directly but I prefer to have a formal inlet. Inlets come in 15 amp, 30 amp, 50 amp, etc; match your cord set to the inlet. 
If you wire the inlet to your transfer switch (see this article), you will not need to change from the inverter to generator manually.  I also like protecting my generator from the elements. I live in an area with extreme snow so the generator box is necessary. This is the box I tossed together one afternoon.


There are many options for generators, most operate on gas but some use propane and larger ones use diesel.  The next installment of this solar power series will cover solar controllers.


Friday, April 29, 2016

Solar Power: Part 4-Transfer switches

A transfer switch is optional but a big convenience. The transfer switch automatically switches between the inverter and shore power. Shore power is any outside source of electric such as the tradional electrical grid (extension cord) or a generator.

Living off-grid, we get most of our energy from the sun but sometimes, we do not get sufficient energy from the solar panels to completely charge our batteries (such as during long winter snow storms). I use my generator as a backup to charge my batteries. Or we may want to use more current that our inverter will permit (such as a big tablesaw). On these occasions, I also use the generator.

The transfer switch has three wires. You may need to provide your own wiring for some transfer switches but the same wires will connect to your sources. One wire will plug directly into the outlet of the inverter. The other two wires connect to AC input (shore power or generator) and AC output (house electrical panel). The transfer switch automatically switches the energy to the inverter. Normally, my inverter converts my 12V battery to 120V AC power. When I use shore power, the transfer disconnects the inverter and automatically connects the shore power to provide energy to my home. There is a very short time lag for the switch over so it is best to turn off any computer and such unless they operate on an internal battery or APS battery backup.


A transfer switch is not mandatory, it is possible to do this task manually with either an electrical switch or series of electrical plugs. However, I like the lazy approach, just power up the genny and poof, I have power. My primary use of my genny is to charge my batteries or work on construction projects that require my air compressor or other tools.

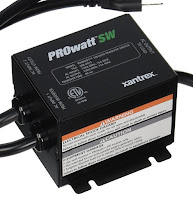
Transfer switches are rated for a maximum amperage. My needs are minimal so I have the Xantrex 15A unit but most will want a 30 amp unit or even a 60 amp unit. Transfer switches are available at electrical supply stores and amazon. I have linked the Xantrex and Go Power transfer switches at the bottom. The Xantrex is limited to 15 amps and the Go Power to 30 amp.

In part 5 I will cover connecting to shore power including generators. Thanks for being a part of this on going discussion.


Tuesday, April 26, 2016

Solar Power: Part 1-Introduction


Entire books are written the subject of solar setups so I will try to digest it down to the basics.  The book I would recommend for learning about setting up a solar power system is the Solar Electric Handbook. (Purchase of any of these items through our links will give us a few pennies to cover internet costs and allow us to continue providing additional content, thank you).

 Designing a solar power system can be fraught with tension and stress. There are so many terms and it seems each device uses a different nomenclature. There are watts, amps, amp hours, volts, etc. It is enough to make you think you are at the United Nations and no one has a translator.

In a series of post, I will show you how I designed my solar power system and I will detail the reasons for each item I selected. I am assuming you want a basic system that cost $5,000 or less and will provide for basic needs such as a refrigerator, LED lights, tv, fans, laptop and mobile phone charger, and other basic needs. Appliances requiring high electrical needs (heaters, large air conditioners, clothes dryers, etc) can be operated with solar but require a larger system and most likely you will need a qualified professional for the install. What I will detail is a basic system I use in my tiny house.

Let us first list the required components: solar panels, solar controller, inverter, batteries, fuses, maybe a battery charger, transfer switch and monitors, and wires to connect all together. I installed the solar controller, inverter, transfer switch and my main electrical panel in a box on the tongue of my tiny house trailer. These items are outside my home but protected from the elements. The attached photograph shows the basic components. I will detail my reasons for each item in a series of blog posts but many other items work just as well if not better.

Batteries can not be stored outside in my region because they will loose amperage in cold weather. I have four deep cycle AGM batteries installed into a cabinet that is also my lamp stand adjacent to my chair.

Your first duty is to determine: Can you afford to go solar. If all you need is one or two LED lights and charging your mobile phone, you can setup a system for $100 or so. However, operating a tiny house with more comfortable needs will cost a bit more and will depend on your needs. A basic system will cost approximately $3-4,000 dollars (assuming new components). I define a basic system as one that can power an apartment size refrigerator, tv and dvd player, laptop computer, LED lights, fans, and other basic needs.  Therefore, moving forward, we are designing a basic system as I defined above.

Wow, $4,000 dollars, that is a bit steep for a basic system-some will say. However, the cost to get electrical service in the bonnies can top well over $30,000 or more. Solar is also an investment, being off-grid frees you from the invoices of the power grid. If you are a prepper, solar will be the only power available when the grid is shutdown by unrest or other problems.

Most books and professionals will tell you first need to add up all your electrical needs to design your system. I prefer to work backwards designing my system (figure out the system I could afford and then see what it would power) because I am on a limited income. I have no choice but to do solar because the electrical grid is not available to me.

So, this is how I started. I planned for a $3500 system with all new quality components. This would be able to generate 400 watts of power from four 100 watts solar panels. This is where it get confusing; it is not complicated but can be tedious because not all items speak the same language. Your friend is the following formulas:

Watts = Amps X Voltage
or the same formula rewritten as

Amps=Watts/Voltage

I may have lost a few of you, not to worry, this will not be a math class. I will give you instructions to figure your needs. Let us assume you live up north where there is less sunshine in the winter. If you live in Texas, Florida or other areas with abundant sunshine, you will have much more power available 12 months of the year. Living up north, we get about 7 hours of usable sunshine per day in the winter (assuming blue skies or light overcast).  Remember that figure from above, 400 watts from the solar panels. Take the hours of usable sunshine per day (7) and multiply it by the 400 watts to give you the total energy generated per day in the winter from your solar panels; in this example that is 2800 watts. You will get some loss of power because of resistance of the wires and such so let us assume you are getting 2500 watts of power added to your batteries each day. Of course, in the summer you will have more sunshine but you need to design you system for the times of the year with limited sunshine. Unless you have a summer cabin that is not used in winter or some other twist; I am assuming you are designing this system for year around use.

WooHoo, now we are making progress. But wait, batteries are measured in amps or amp hours.  No worries, just convert it. 2500 watts on a 12V system is 208 amps (2500 watts/12 volts = 208 amps). So, on this one day of sunshine you have added 208 amps to your batteries (assuming the batteries needed to be charged). Wait, you can not use all that energy because your batteries should not be discharged below 50% (assuming you have lead acid batteries, not salt water batteries). Therefore, divide the 208 amps by half to get roughly 104 amps for your daily use.

Ooops, here we are again at the United Nations; most electrical items are not rated in amps, many are rated in watts. For example, a 60 watt bulb or a 37 watt refrigerator. No worries, just convert it again: 104 amps X 12 volts = 1248 watts. You have 1248 watts available for your 24 hour day; the next day more energy will be generated. Some days, you might have excess and other day, you might draw more than what is generated from the batteries.

In the next blog post in this series, I will explain batteries and how to calculate your needs for battery storage and use.